Since we just bought a house, and are spending a lot of money on that right now, we have officially decided to not take a big honeymoon right after the wedding. Instead, we will be going on a quick getaway to Newport, Rhode Island for a few days after the wedding!!
We live very close to Newport, and have been there before, but this little trip will allow us to play tourist and get to do some things that we have not done before. It will also be our first vacation with just the two of us. I'm very excited for what we are going to do.
Some of the things I have come up with are the touring the Newport Mansions, doing the Cliff Walk, wine and brewery tastings, a picnic on the Ocean Drive, playing tennis at the Hall of Fame, dinner at 22 Bowens and the Newport Blues Cafe, a helicopter or hot air balloon tour, a Segway tour of Downtown, and learning how to blow glass at a local studio.
Anyone else have any recommendations as to what we could do? We're only going to be there for three days, so our time is limited, but we want to try to do as much as possible.
So, where I last left off, I had just found a blush without any metals, and was going to talk to you about my beauty routine and how it applies to the wedding day.
I currently wear makeup every day for work, and when I have things going on on weekends that I leave the house for, not including errands. I usually try to give my face at least one day off per week.
Since I have so many problems with my skin, I used to go to the dermatologist multiple times per year, trying to find solutions for the issues. The dermatologist would prescribe something new every trip, and some of them would work, and some of them would not.
No matter what, I would always have acne, and it's at its absolute worse a few days before that time of the month. But, it seems like that's just hormones, so there's not much that can be done about that. The other problems I was having however, should have been treatable with topical medications, but no matter what we tried, nothing seemed to be working.
I stopped going to the dermatologist about three years ago, when it turned into me wasting money going to appointments and filling prescriptions for medications that weren't working. Instead, I decided to try just using normal soap and then sunscreen as a moisturizer. Even the oil-free sunscreens though were causing my face to be greasy and just felt too heavy, not to mention that my makeup was essentially melting off of my face by the end of the day. So, I decided to try the face wash and moisturizer that Bare Minerals came out with. It's a dry face wash that you add water to to form a paste, and wash your face with that. That seemed to be working for a while when we were living in Indiana, but then we moved back to Rhode Island, and the humidity seemed to really make everything melty again, and the face wash didn't really seem to be helping out my skin any longer.
I gave up, and just started using Aveeno Body Wash on my face, and then using their Daily Moisturizing lotion on my face after washing. I have been doing this for a few months now, and have noticed that my face is so much less oily, and that it isn't as dry in some of the places that I had flaky skin.
So, in terms of the wedding day, I will be doing my own makeup. I don't want to look overdone, and want to look like my normal self, but I also know that for photos, the makeup needs to be a bit heavier.
Here are some inspiration pictures of what I'm trying to go for:
I really want something that looks light, where my eyes aren't too dark, and my lips are just a slight shade of pink. I have decided that I will be wearing my glasses, so my eyes will need to stand out a bit more than normal, but I typically don't like the look of eyeliner, so I'm going to have to experiment a bit.
Any thoughts or suggestions on how I should go about doing this? Because, oh, by the way, this is going to be DIY. I can't take any risks with makeup artists doing my makeup because of my allergies to so many products. Suggestions on products?
Saturday, FMIL and I took the trek up to Wayland, MA to pick up my wedding dress!!!
We got to the shop, I tried it on, and I loved it all over again. It was beautiful! And to top it off, it fit! I was so scared that it wasn't going to (don't all brides fear this?). But, I am happy to report, that it actually needs to be taken in in some places. Phew!
So, now I have to hang it up in FMIL's closet so that FI doesn't get a glance of it. My first fitting isn't until July 31st, so I have some time still before anything needs to happen with it.
Dress in it's garment bag / Personal Picture
I can't wait to show you guys my dress outside of the garment bag!!!
If you missed Friday's post, you should go back and read it, but if you don't want to scroll down, I understand...
So, I'll just tell you here:
WE BOUGHT A HOUSE!!!!!! Woooooohoooooo!!!!
We couldn't be more excited! This is the house we knew we wanted as soon as we saw it the first time. The layout is perfect, the location is ideal, the potential is incredible, and it just works. We love it.
Yesterday, we met with our realtor to sign the Purchase & Sales Agreement, and today, I will be calling home inspectors to get one to look at the property. If all goes well, and we are ok with what we find, the final step is financing, and then we'll have ourselves a house by the end of July!!!
Signing the P&S Agreement / Personal Picture
Just another thing to add to the table right before the wedding. Call us crazy, but we just see it as another reason to celebrate!!!
Glass Bottle of Champagne to Celebrate / Personal Picture
As I believe I have mentioned before, I have the world's most sensitive skin.
I have rosacea, dermatitis, and adult acne.
I used to use liquid foundation, because I thought that it would cover my rosacea while also keeping my skin moist, since I have combination skin on my face - part dry and part oily. The problem with that is that the dry parts of my skin, where my dermatitis is, would just end up looking really flaky and scaly under the liquid foundation, and I could literally peel pieces of skin off my face in the afternoon, even if I scrubbed all the dead skin off that morning. That's what the dermatitis does. Sounds lovely, right?
So, back in October 2009, my mom came out to Indiana to visit, and I had done some research prior to her arriving on new makeups, and specifically, mineral makeups. After reading hundreds of reviews of Bare Minerals, and how so many women with rosacea found this to be the perfect solution to hiding their redness, and it actually helped over time to reduce the redness. I thought to myself, "Perfect. This is exactly what I need." Mom and I drove the hour to the Bare Minerals store, sat down, and the beauty consultant gave us each a mini-makeover using the makeup. I loved the way that it looked, and so my mom bought me the starter kit as a belated birthday gift.
Image via Bare Escentuals / Bare Minerals Starter Kit
Less than one week into using the product, my eyes started getting really itchy and swollen, and then I began getting little bumps on my cheeks, and those were bright red and also itchy. I stopped using the makeup immediately, knowing that that was the one variable that changed in the last week. I immediately hopped on Google, searching for "Bare Minerals itchiness."
And, so guess what I found...
Bare Minerals Original Formula contains metal, in the form of Mica and Bismuth Oxychloride.
Both of these two ingredients are actually ground up metals, which are used to give you the shine and glow from both the foundation and the bronzer that comes in the starter kit.
Now this isn't really a huge surprise, because I'm allergic to many different types of metal, which causes me a lot of problems in the jewelry category, and apparently, the beauty products categories. So much, that I must wear pure metals, i.e.: .925 Sterling Silver, over 14k White Gold, and Platinum. Sometimes the metal backs of pants buttons irritate my skin, and need to be painted over with clear nail polish.
Ok, back to the makeup part of this story:
I was allergic to Bare Minerals. So, now what? I found a mineral makeup that worked really well for covering my rosacea, didn't cause flaking from my dermatitis, but make me all blotchy and swollen and itchy.
So, I turned to Google again, and googled different mineral makeups. Every. Single. One. Has at least one of those two ingredients. Yep, just my luck. So, I contacted Bare Minerals to see if they had any suggestions, and they did!
Bare Minerals has a Matte Foundation, which does not include any metals. So, I scooped that up, and I've been using it every single day since then, with absolutely no issues!!!
But, the other problem was the bronzer, which Bare Minerals does not have a Matte version of. Since I had bought out the rest of Clinque's Soft-Pressed Powder in Rhubarb at my local store(s) the year they discontinued that shade, I just decided to go back to using that everyday as a blush and partial bronzer.
Fast forward to two weeks ago, where my last compact only has pressed powder around the edges, and is completely worn through to the bottom of the casing in the middle...yep, time to buy some more blush.
Almost-gone Blush / Personal Picture
So, I headed over to the mall, hopped into Macy's, went to the Clinique counter, grabbed their blush, looked at the ingredients list, and guess what I saw. Mica. And guess what else is there. Bismuth Oxychloride. Great, allergic to that now too, since they changed their formula after I bought all my compacts.
I'll tell you, I went to every single makeup counter at all of the department stores and all of the specialty makeup stores in that mall. I spent almost 2 hours looking for a new blush, and not a single place carried one without Mica or Bismuth Oxychloride in it.
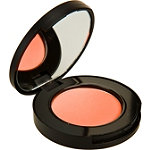
I ended up going to my best friend Google again, and searching for metal free makeup - 1 result. A $22 compact only sold at Ulta - Amazing Cosmetics Amazing Seven Blush Matte. It's cream based, and I have yet to buy it or try it out, but I'll let you know how it goes.
Amazing Cosmetics Amazing Seven Blush Matte / Image via Ulta
Next, I'll tell you about my trials and tribulations with other beauty products, and how this actually relates to the wedding day.
Have any of you had problems with metals in makeup? Anyone use the Amazing Cosmetics Amazing Seven Blush Matte? Opinions?
My first thought was to include a pumpkin on each table, and either paint or carve the table number into the outside of the pumpkin, not puncturing through the skin completely.
FI had mentioned to me that the pumpkins would need to be carved at least a day ahead of time in order to get them done time wise, and that they would also likely need to be sealed some how so that the raw part of the pumpkin doesn't start to go bad and smell. So, we ultimately decided that we'd pass on the gross, smelly centerpieces, and look for other ideas.
I thought about using different vases, or just a candle on a mirror, but I really didn't want somewhat-open flames at our reception - some of our friends are slightly destructive around fire around anything ;)
So, by stalking Pinterest (come on, you can't seriously tell me that you don't have an account, and expect me to believe that, right?!?!?!), I think I have finally come up with an idea. You see, my FIL's drink a glass of wine at dinner every night, alternating between white and red, depending on what's being eaten. Because of this, there are always empty wine bottles in the recycling bin. So, when I came across this post about cutting wine bottles, which actually happens to be posted on a blog owned by a friend from high school, I immediately knew I wanted to use that as the missing part of my centerpieces.
I have been saving all the clear white-wine bottles for the last few weeks, and will be trying this tutorial this weekend, verifying that this is the route I am going to go for my centerpieces.
In the meantime, however, I have been thinking of ideas on how to make this a little different. I don't want to do the typical table number label on the wine bottle, and I plan on putting something inside to make it look better, but to save some money, I have decided against flowers. I think that there will be plenty of flowers and greenery in the Botanical Center as it is, so I originally decided to buy the thinnest wooden dowels made, spray then green, and put them in the bottle with one of them holding the table number at the top. After looking at Home Depot, Lowes, and Michaels for wooden dowels, I thought that paying between $0.15-$0.64 per dowel was a little crazy, especially considering I would still have to paint them, so I started looking for alternatives.
I came across some floral sticks from Save-on-Crafts, one of the many (bridal) superstores for craft supplies on the internet. The sticks are called Midollino sticks, and I had never heard of them before, but apparently you can submerse them in water and they become flexible so you can shape them the way you want, but you also don't have to do that. I have ordered three bunches from Save-on-Crafts, and am waiting for them to be delivered.
Having finally found something to act as the contents of my cut wine bottles, I realized that the sticks would not be sturdy enough to hold a table number, so I decided to make little picture holders out of wire, and then place them in the wine bottle along with the Midollino sticks.
On my trip to Joann Fabrics this weekend to get the pocket square fabric, I wandered throughout the rest of the store (Can you honestly avoid this when shopping? If so, please tell me how!) and happened to find 12 gauge wire, in "Lime," which happened to be an almost perfect match to the color of the Midollino sticks online (from what I can remember...I haven't actually seen the color in person yet). So, I bought two packages of it, totaling 10 yards. I knew that I had needle-nose pliers and wire-cutters at home, so I checked out, knowing that I had everything to make the picture holders.
I'll show you the final product now so that you actually know what I'm talking about when I say "wire picture holders."
Wire Picture Holder / Personal Picture
And now, here's how I made them:
Supplies
12+ gauge wire - The higher the gauge number of the wire, the more sturdy it will be, but also understand that the higher the number, the harder kinks are to remove. I wouldn't recommend much lower than 12 - you may end up with sturdiness and strength issues.
Ruler - To determine how long you need your holders to be.
Needle-Nose Pliers - To easily bend the wire without bruising your fingertips.
Wire-Cutters - To cut your wire...yep, pretty self-explanatory :)
Something round - I used a wine cork (very appropriate to this post, btw) to make the circle at the top. You can use whatever you have around, just take into consideration how large or small you want the round part of the picture holder to be.
Supplies / Personal Picture
Step 1: Create the Top Circle
Take one end of your uncut wire, and wrap it twice around the object you have chosen to create your circle. Be sure to do this as tight as possible.
Wrapping the wire around the cork / Personal Picture
Step 2: Bend your Ends
Using your needle-nose pliers, fold the end of the wire over or under, whichever you prefer, to create a curved end, which doubles as making the top of your picture holder a little more safe by hiding the sharp end of the wire.
Folded over end of wire at top of the picture holder / Personal Picture
Bend the other end of your wire at a 90 degree angle, making the stem for the picture holder.
Bent end of the wire making the stem / Personal Picture
Step 3: Create your Stem
Measure how long you want the stem of your picture holder to be. Because I am inserting my picture holders into wine bottles, I needed to make sure that they were long enough to stick out the top of the wine bottle so that my table numbers would be seen. The stem of my picture holders ended up being 10.5" long.
Using your needle-nose pliers, bend the wire at 90 degrees to mark the end of your stem and the beginning of the stand part of your picture holder.
Step 4: Create your Stand
At the base of your stem, where you bent the wire at 90 degrees, create a spiral with a little extra wire from your length. You don't need too long of a "tail" here, but in the picture below, you will see that I have about 5" or 6" extra acting as the stem.
Curve the "tail" of your picture holder into a spiral to act as the stem, holding up the picture holder on its own. Test this on a flat surface.
Stand of the picture holder / Personal Picture
Finished Product:
Wire Picture Holder / Personal Picture
The nice part about these picture holders is that when grouped together, the stands can also double as your beautiful bouquet!
Wire Picture Holder Flower Bouquet / Personal Picture
Just kidding.... It is way less expensive than a bridal bouquet though ;)
So, to conclude, I made 14 wire picture holders in less than an hour, and this was my first time making them ever - wicked easy project.
Have you used Pinterest to help plan your wedding? What projects have you DIY'd that you first saw as a pin?
Yes, I know it's only Tuesday, but still. Got any plans?
I do.
I'M PICKING UP MY DRESS!!!!!!!!!
I am so excited, but really nervous at the same time. I'm really worried that it's not going to fit. But, since I'm not starting alterations until July 31st, I still have some time in case it doesn't.
I'm sorry that I can't entice you to check back later this weekend for pictures, because I'm still going to keep the dress a secret on here, just in case of wandering eyes :)
But, I took a trip to Joann Fabrics this weekend, and got some supplies to make the DIY Pocket Squares for the guys' suits. So I will be taking out the sewing machine this week, and making those up, along with the pillow cases. It's really time to get cracking on some of these projects!!!
We are still in the offering process of our house hunt. We've been going back and forth with the seller on this house since we submitted our first offer last week.
I really hope that everything turns out alright, and that we are able to call this house our home.
And, just so you know, I've broken out even more than I had last week - stress does not do well for my skin, apparently.
And, it's so much stress, that I've taken up drinking...
My Favorite Wine / Personal Picture
This whole experience makes me wonder if I ever want to buy a house again!
Do you have any horror stories about your home purchases? Please share!
Ok, I'm giving you fair warning: this is going to be a very picture heavy and an extremely long post. I'm hoping that it will really help you along with this process though.
---
When I first got started into blogging, I was originally inspired by Heather at Road to the Aisle, and now Heather Drive. At the time, Heather was planning her wedding to her husband and was doing a majority of the work herself.
One of the blog posts that she put up was how to make a card box from picture frames. I immediately subscribed to her blog via Google Reader, and added the link to this post in my digital wedding planner (Um...this post was made in September of 2007. That's almost 5 years ago...and yes, I really did start planning our wedding that long ago). So now that it is finally time to plan my wedding because we actually have a date, unlike 5 years ago, I knew that I still wanted to be able to do this project, especially because it allows us to show off more of our engagement pictures!
I know that Heather includes a tutorial for this project on her blog, but I wanted to include one here as well since some of the steps are a little different.
So here we go!
Step 1: Gather your Directions
Since I was following Heather's directions, I loaded up the page on my iPad and set it on the counter for me to reference. You can do the same with this post :)
Step 2: Select your Pictures
Make sure that your pictures are all positioned in the same direction, i.e.: portrait vs. landscape
Step 3: Buy your Picture Frames
Choose the correct size frames for your pictures, but make sure that your box will be big enough for cards. You don't want the frames to be too small. (Mine are 8"x10" frames to fit my 6"x9" pictures.)
The frames do not need to have mattes unless you want them, but they do need to be wood, otherwise the hardware will not attach easily.
Step 4: Buy your Hardware
I went to Home Depot to get my hardware.
When selecting the "L" Brackets, make sure that they are not too deep for the width of your frame border. You want them to sit well on the edge of the back of your frames.
When selecting your screws, make sure that they are not too long, because you do not want them to poke through to the front side of your frame. Also check the size of the head, because you want to make sure that they fit in the top of your "L" brackets without going through all the way.
Step 5: Remove the Stands
If your picture frames have stands on the back, they should be removed. If you wish to not remove them, you can attempt to tape them to the back of the frames so they don't open, but I can't guarantee that affixing your hardware and putting your box together will work well with them still attached.
To remove the stands on my frames, I gently pried off the ribbon that keeps the stand at it's maximum distance from the top of the metal clip.
Next, I pried off the hinge that anchors the stand onto the back of the frame by grabbing a hold of it and gently wiggling it from side to side, slowly loosening the bracket.
Step 6: Frame your Pictures
Matte and frame your pictures, being sure to clean the inside of the glass. You don't need to worry about the outside of the glass until the box is put together, since more fingerprints will end up on the glass during the process of putting it together.
As you will notice below, my pictures are all landscape, so my card box will be Landscape-Style.
On the back of your frames, make note of what part is the top and bottom of the picture, that way when you put the box together, all of your pictures are going in the correct directions.
Step 7: Measure & Attach "L" Brackets
Measure where you would like your brackets to be placed on your frames. I used two brackets per side, and placed them 1.5" away from the ends of each frame. In the picture below, you can see two of the brackets, with a small pencil mark where I measured the placement. The directions from Heather state that you should use a drill to make the holes, and then screw your screws into those holes. I didn't find the need to use a drill, and was actually able to just screw the screws in with a hand-held screwdriver.
After I attached one side of the bracket to the frame, I then attached the other to another one of the frames. You may need a helper to hold the second frame for you while you attach the screws.
Once you have the two frames together, do the same to the other two frames. Once you have two sets of two frames bracketed to each other, attach them to the other two frames, making all four sides of your box. You may need a second set of hands to hold the frames when you are screwing the brackets into place.
Step 8: Create the Top and Bottom of your Card Box
In her tutorial, Heather uses foam board for the top and bottom of her card box. I did not have an foam board, but I had tons of cardboard, so I used that.
Find some sort of cardboard, foam board, or even wood if you want.
Cut off the bigger sides of your cardboard box, if you are using one. If not, skip to the next part of this step.
Put the card box over the piece of cardboard/foam board/wood with the top of the box on the bottom, and trace the inside of the top of your box onto the cardboard/foam board/wood.
After you have traced the top of your box, write "TOP" in the middle so you can decipher between this piece and the piece for the bottom. You may also want to label where each picture is, so you can ensure that you have a perfect fit, you know, just in case your card box isn't perfectly square....like mine ;)
Remember to do this same step for the bottom of your box, too.
Step 9: Create your Card Slot
Find an envelope that you would consider standard size for cards. Depending on the direction that your frames will be, portrait or landscape, you will want to measure the sides of the envelope. My recommendation is to use the short side for Portrait-Style Card Boxes, and the long side for Landscape-Style Card Boxes.
Measure out and mark the center of the Top of your card box. From that point, measure out the length needed for your card slot, and mark the ends of that. Make those measurements into a rectangle that you can cut out. I would not recommend your opening to be wider than 1/2" - you don't want anyone's fingers getting into your card box!
Next, cut out the slot that you drew for your card slot. It is helpful to have a box cutter to do this, as it is hard to get scissors into the middle of the piece of cardboard/foam board, and definitely hard to get scissors to cut wood...just sayin'.
Step 10: Decorate the Top of your Card Box
The next step is to decorate the top of your card box. First, you must decide how you want it decorated. You could use fabric, scrapbook paper, paint, or anything else you can think of. I decided to use fabric for mine, and I had a tough choice of which fabric square to go with.
Because I am using fabric, I wanted to add a layer of quilt batting to make it look a little softer and to hide some of the flaws in the top of the cardboard. This will also help in making the top not see through, so you can use a lighter color fabric if you wanted, and not risk the print on the cardboard showing through.
Lay out your quilt batting and put your card box top on top. Cut around the box top.
Trace the inside of your card slot using a marker, as pencil and pen will likely pull the batting apart when dragged along it.
Once you have the card slot traced onto the quilt batting, use a pair of scissors to cut out the opening.
With your chosen fabric face down on your work surface, place the batting on top, followed by your cardboard top. Cut around the fabric so that you have enough to wrap around both the batting and the top. Always leave a little extra than you think you may need. You'll see in the next few pictures that I cut mine too close around and almost ended up needing to start over.
Using your glue-gun or staples, depending on the material of the top that you chose, start attaching the fabric to the top of the card box, starting with the card slot, and then the sides parallel to the longest sides of the card slot. This will help you make sure that you don't stretch the fabric in the wrong direction while glueing/stapling. I ended up using a glue gun, running glue around the borders of the cardboard box, then using a paperclip to fold the fabric down onto the glue, that way I wouldn't burn my fingers. You can kind of see the paperclips on the right side of this picture:
Once you are done glueing, the back of your box top should look like this:
The front of your card box top should look like this:
And if you've done it right, your fingers should NOT look like this:
Step 11: Attach your Bottom
The next step is to attach your hardware to hold the bottom of your card box in place. Measure where you would like your brackets to be placed on your frames. I used one bracket per side for both the top and bottom, and placed them in the middle of each side of the frame. In order to allow for enough room for your card box to spin, the bottom should be inside of the card box. To do this, attach your brackets in the other direction, so that the bracket part faces into the interior of the card box. In the picture below, you can see the bracket screwed into the middle of the frame edge, facing the inside of the card box.
Once you have attached all four brackets, one in the middle of each frame edge, take your bottom piece, and slip it in to the card box. The picture below shows what the bottom of the card box should look like:
And this picture shows what the bottom of the card box should look like if you were looking into the box:
Since the bottom could easily be removed, it needed reinforcing. I decided just to use packing tape, and from the inside of the box, I just taped the box to the bracket. You can kinda see the packing tape in the pictures below. I should have used something with more color. It's kinda difficult to take a picture of something clear...
Step 12: Attach your Lazy Susan
First, you must get a lazy susan, but let's pretend that you already did that ;)
You can see it better in the picture below, but my lazy susan has a lip around the edge, which means that the box would only be supported by that lip. To reinforce it, I decided to cutout some scraps of cardboard to make the center of the lazy susan higher, so that the card box would rest on a larger surface area.
So, find some extra cardboard - this can be from the same box you used to make your top and bottom, or from another one. I am using two flaps from a cardboard box.
Depending on the size of your lazy susan (mine is 9" in diameter), you may need to cut your cardboard flaps in half.
Next, place one of the halves in the center of your lazy susan, to determine what size is needed. I refused to measure this, because there is no need to be super precise, so I just eyeballed what parts of the square were too big, trimmed them off, and repeated until the square fit in the middle of the lazy susan.
After you have figured out the size of your cardboard, figure out how many pieces you will need to make the height equal to the height of the lip around the lazy susan. My lazy susan needed 3 pieces of standard cardboard.
Cut the number of cardboard pieces needed to the same shape by just tracing around the correctly sized cardboard piece.
To help with stability, tape the pieces of cardboard that you need together on all four sides.
Next, you'll want to attach your cardboard pieces to the lazy susan. I used the rolled-tape trick, but feel free to experiment other options.
Once you have the cardboard attached to the lay susan, test the security by lifting the lazy susan by just the cardboard pieces. If the cardboard pieces come un-stuck from the lazy susan, you must bring in the reinforcements. If not, then you will win the war!
I needed to reinforce mine, because the patterned surface on the lazy susan did not like my packing tape. So, I just added a few more pieces of tape connecting the cardboard to the sides of the lazy susan. If you do decide to do this, make sure that your tape does not interfere with the spinny-ma-jig-thingy underneath the lazy susan.
Next, attach your lazy susan to the bottom of the box. I used the rolled-tape trick again for this part.
Don't try to place the box perfectly on top of the lazy susan, like I started doing. It is soooooooo much easier to flip the card box over and place the lazy susan on top. I promise.
You may also need to provide reinforcements to this part of the process. You can see above that I added some extra tape attaching the side of the lazy susan to the bottom of the box. Again, be careful of the spinny-ma-jig-thingy underneath.
Finally, flip your card box over, and test the spinning!
Step 13: Attach your Top
For this last step, you have a few different options.
You can attach your brackets using screws, or attach them using glue.
And I will tell you straight out, I tried both, and ended up using both.
I first attached my brackets using screws, making sure they went down as far as possible without breaking the frame, that way the top of my card box could sit somewhat inside the frame borders.
Next, I applied glue to the top of the brackets, and placed my card box top on the top of it.
Make sure when you do this that you are putting your box top on in the right direction.
To help the glue stick to the card box top, I needed something with weight to hold it down. Since I didn't want to collapse the middle of the card box top, I decided to use some soup cans to hold down the top in the spots close to the brackets.
Even though it was probably not necessary, I let the soup cans sit overnight, making sure that the glue inside dried. After testing the top by pulling it up slightly and slowly, I knew that it was attached well.
Ready for pictures of the finished product????!!!!!
And here's a little video for you of it spinning!
PS - How awesome is it that it ends perfectly, right on my favorite e-pic?!
Feel free to contact me if you have any questions about my card box tutorial, and please let me know if you use my directions! I'd love to see your outcome.